
Stained Glass Class
- Queen Olive Us
- Apr 30, 2023
- 3 min read
Queen Carol L has an amazing and talented niece, Michelle, who is an expert Stained Glass maker and designer, and today she has invited us to her studio in Fallbrook, CA, to learn about how stained glass is made, and to try our hand at making a project of our own.


We were welcomed onto the property, and enjoyed checking out some of Michelle's gorgeous creations.
After we had a tour of her studio and admired all her stunningly gorgeous creations, we grabbed our seats so the class could begin.


Michelle gave us a quick tutorial about stained glass, then demonstrated the process
by drawing a design, laying the design on a piece of glass, cutting out the shape,
and then carefully grinding the edges to make them smooth..


Barbara, Leslie and Carol N give grinding a try. Eventually each of us took a turn.
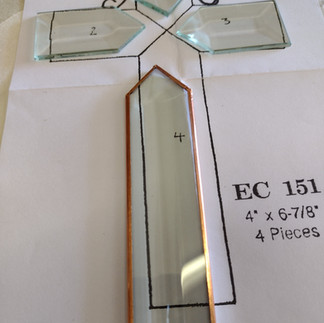
Our project is to make a beautiful cross with beveled edges.


We started with four pre-cut pieces and a pattern. Step 1 - Place the pieces onto the pattern.
(We were very thankful that we didn't have to cut the glass ourselves.)


Step 2 - Clean each piece of glass with cleaner and a soft cloth.
Step 3 was the really tricky party. We had to carefully wrap the edges of each piece of glass with copper foil, do our best not to tear the foil, a challenge in itself, and then press it down and carefully smooth it out using a special file. And then the hardest part - trying to fashion two curly-cues to use for hanging. Michelle had to help most of us with this part.


Applying the copper foil and smoothing it down, and trying to curl the copper wire into curly cues. One piece with the foil successfully applied, and then all the pieces finished including the curly cues.
By this time we all needed a break! And we were hungry, so we headed into town for lunch at Main Street Cafe..


Clockwise from bottom left -
Sharon L, Joy, Toni, Debbie, Barbara, Kathy, Carol N,
Rick (Carol L's hubby), Carol L, Leslie, Kathryn
Our tummy's full and our confidence restored, we headed back to Michelle's studio to complete our projects.
Step 4 - Soldering the pieces together. Michelle gave a demonstration on how to do this. Soldering is very challenging to say to say the least, and requires a very steady hand.


Michelle makes it look easy - it is not!


Debbie and Leslie gave it a try. The rest of us opted out and Michelle graciously did it for us.
Step 5 - The last step was thoroughly rinsing, drying, waxing and polishing the cross.

All finished. So beautiful - we all love them!

Showing off our finished pieces
Front: Michelle, Joy, Leslie
Back: Carol N, Debbie, Kathryn, Kathy, Barbara, Sharon L, Toni, Carol L
Thank you, Queen Carol L for planning such a fun day for us. And thank you Michelle for being so kind and patient with us. We all came away with a much bigger appreciation for stained glass and how much time, talent, and effort is required to make it. This project was supposed to take 2-3 hours to complete. It took us all day. Just to make this little cross consisting of four pre-cut pieces of glass. Just imagine doing everything from scratch - designing the piece, cutting and grinding all the edges, then putting all the pieces together and soldering them into place. When you know what all goes into making a piece of stained glass, it totally justifies the price. Maybe we'll get to do this again one day.
Comments